

“Why oh why did I leave it so long!!??”
We’ve all said it.
More than once.
But we never learn.
It’s not that often is it that we unearth a UFO, finish it and aren’t please. I mean, if it was that bad in the first place it would’ve ended up in the bin not chucked in the corner.
So a while ago I borrowed V8805 of my real life sewing buddy Jeanie.
Jeanie’s the one who got me going again, so to speak. She’s made umpteen versions of these. For my first I used up some left over denim. The dark blue was from my GBSB capri pants and the raspberry was from my Mexican dress and also a peg bag. You might even recognise pinky red denim from other blogs – I’ve seen Jeans on The Prolific Project Starters blog and also a cute little dress only a couple of weeks ago on Making and Markings blog. (I’ve just looked and Minerva still have it in stock). In fact it was Camilla’s recent post that reminded me I had this UFO buried somewhere in my sewing room.

And it was the Monthly Stitch that gave me the much needed kick up the butt to finish this easy peasy make.
There wasn’t even much to do. I’d only abandoned it because the neck was too tight and I thought the shoulder seams were in the wrong place.

I marked with a biro how low I wanted the neckline to be then used my dressmakers curve to draw a new neckline.

I also took 1/2 inch off the side but didn’t lower the back. You can just make out the pencil line above.
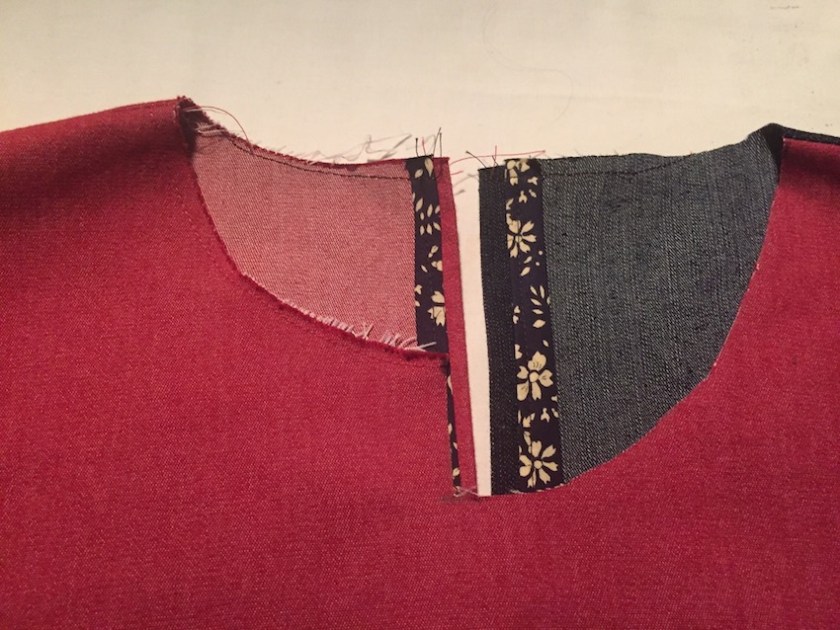
I only cut half to start off with then used the cut out piece as a template to cut the other side.

I didn’t bother pinning or drawing, just held it in place. (I like living dangerously!) Once i’d stopped the neck from choking me the shoulder seams fixed themselves! It was like magic!
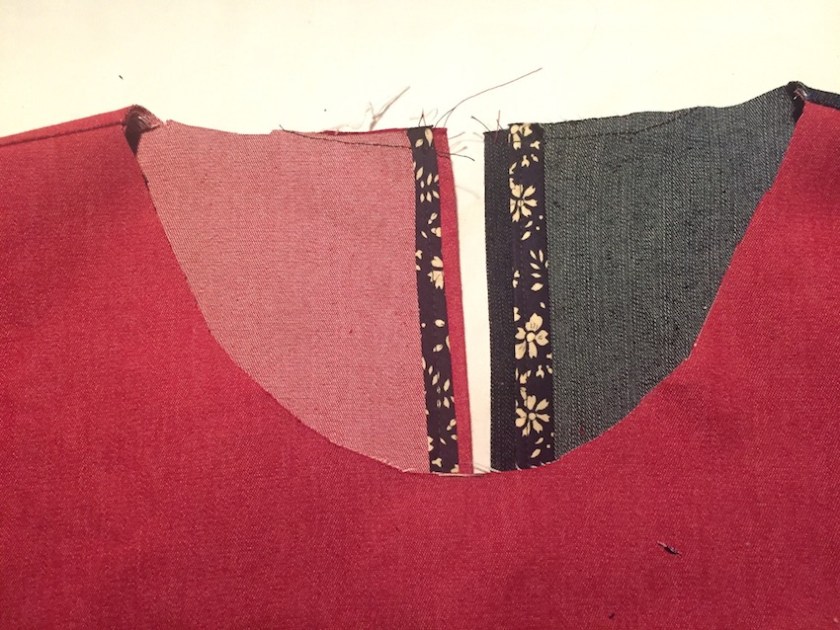
It looked fairly even. I realised straight away I’d chopped off my stay stitching so stitched another row to prevent stretching out.
I finished up the neckline with some bias tape, a loop and a cute red button I found in the button box.

This loop was stitched on the machine and took less than a minute. If anyone’s interested I might do a quick tutorial.

The hem on the arms and hem were straight stitched in red, and hey presto it was finished.
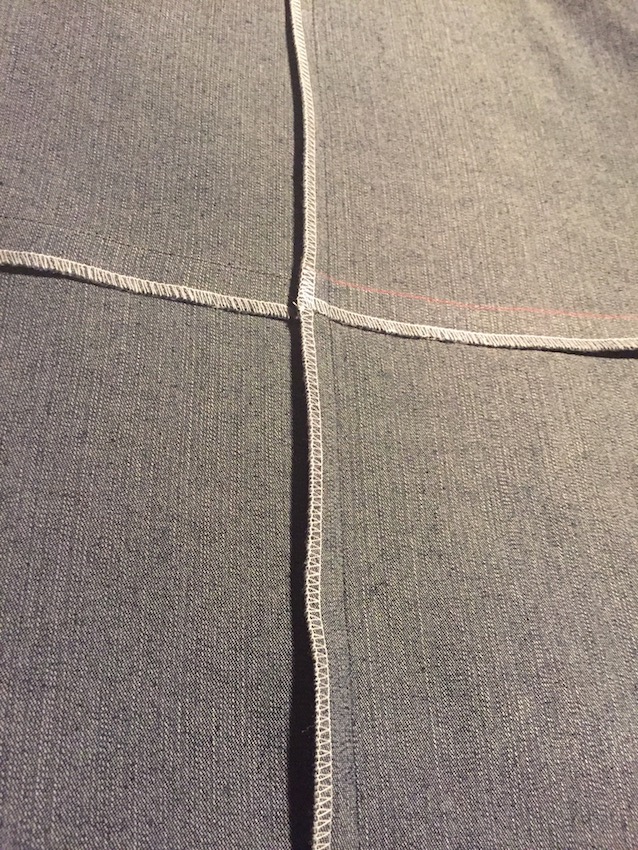
Just to mention before I show you the finished article. I need to show you my clappered seams. The clapper makes such a different to the finish, especially with thick fabric like denim.
Below is the seam pressed.
Then I pressed it again just the same but flattened it with the clapper:
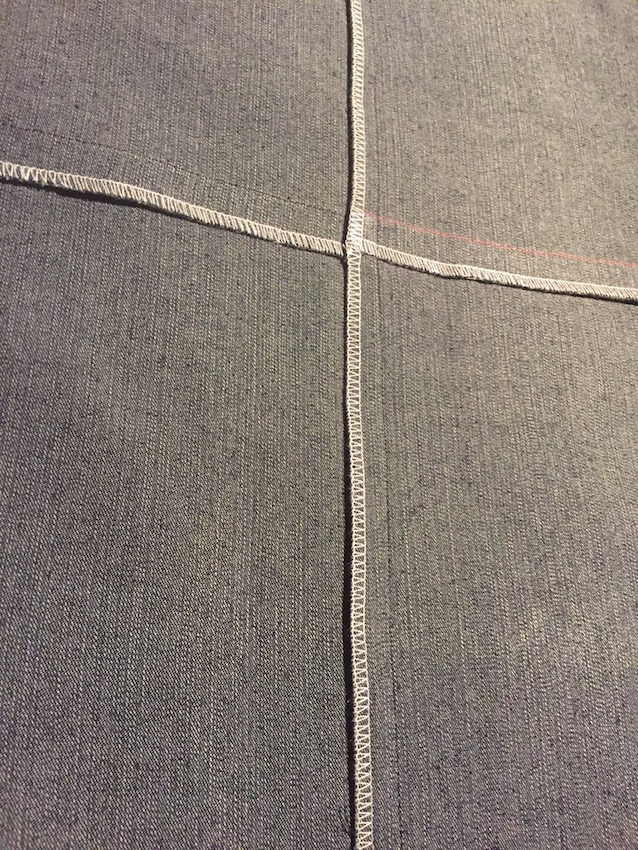
It’s probably the one thing in my sewing room (after my sewing machine) that I really couldn’t live without.
As soon as my frock was finished I wore my dress to have a wander round the local garden centre with my mum. Unfortunately we bumped into someone we knew so couldn’t have a photoshoot as we had planned!
Instead dad took some when we got home.

I didn’t have enough fabric to do the upper part both in red. I’m glad I didn’t know as it detracts the eye from maybe needing a sway back adjustment.

I love dresses but don’t make too many everyday one as I never know what to wear on my feet! In summer I’m ok when I’ve got a bit of colour on my legs but they need covering up in winter!

With the increased width in the neck opening I don’t need the button closure but it adds a bit of interest.

All in all I’m chuffed to bits with my new frock! I think it’ll be just the job for when I go to Portugal with the golfing ladies at the end of April.

So thank you to The Monthly Stitch for prompting me to finish this frock.

Looking great
Thanks! 🙂
Love it! Versatile, flattering dress, will you be making more?
I certainly will, especially given it;s so easy, and has loads of scope for making each one a bit different 🙂
Oh yeah! It looks fabulous! You need more dresses! 😘
I need your legs first!! 🙂
Ha! I don’t think so!!! Yours are just the same! Get the woolly tights off!!
Well I could take me left leg out cos thats my best one, but the others staying covered till it get a tan, lol 🙂
Fantastic dress, the fit is great!
Thankyou! It’s very forgiving and flattering! 🙂
Looking good in your colour block creation.
Pardon my ignorance but what is a clapper and do I need one?
You might do – they’re fab for reducing bulky seams, or setting tricky seams. I used my when making the blocks for the splendid sampler. They’re a bit pricy but i’ve seen home made versions on the blogs of those lucky enough to have a handy hubby. My mum bought me mine for my birthday. :-)http://merchantandmills.com/products/notions/tailors-clapper-seam-presser/
Lovely fabric and colour choices. I am trying to finish a ufo every 2 or 3 makes. My box of shame is very colourful K xXx
Box of shame!! Not heard that before, lol 🙂
Love your fabric combination & yes it would be great if u do a tutorial for the button loop😃
I’m not managing to get a lot started at the mo let alone finished!!
I know what you mean! I just wish someone would plonk a pattern and some fabric next to my machine. I find it hard to choose what to make next and end up just reading blogs instead! 🙂 PS I’ll get on with that tutorial later in the week. Won;t take long.
Great job! I really the color blocking. .
Thankyou! 🙂
Very nice! Not only do you clear an outstanding job but you gain a great dress. I love my clapper too.
Thankyou! They’re fab aren’t they 🙂
Beautiful! The color blocking is fun, especially the red/blue back yoke. What a great solution. As for the clapper…..I don’t have one, yet, but it is at the very tip-top of my list of necessities. You’ve inspired me to get on with my project.
Go Girl! Glad to have inspired you! 🙂
It’s fab and really good on you – what a difference the new lower neckline makes! I didn’t even notice the sway back until you pointed it out, which proves the colour blocking draws the eye away successfully. Lovely!
Can’t beat a bit of distraction from the not so good bits. It’s only for casual so I don’t mind, but I’ll have a go at fixing it on the next one 🙂
Looking good! I think it looks better with the lowered neckline too. Nice work!
Thanks Linda! It’s comfier too, the high neck felt like it was a bit choking 🙂
Looking frabjus in your tights & boots (could do tights + heels, too)! 😍 Clever you to use the half of that re-cut for the other side of the neckline. Yes, please. Do show how you made that loop using your machine. Thank you! xx
I’ve taken some pics for a tutorial, watch this space!! Dress in the wash so it’s ready for the weekend, think this will be worn quite a bit! 🙂
Wonderful! Will be watching… dress is definitely a winner! 😍
Good job finishing your UFO, the dress is great!
Thanyou! It’s in the washer getting ready for the weekend – I’ve a feeling I’ll be wearing this a lot! 🙂
Love the dress!!!
Oh, please do a tutorial on the loop. Thank you in advance. ☺
Thankyou! The tutorial will be coming soon! 🙂
I look forward to it! ☺
Awesome Dress, love the colour combinations, the neckline looks so much better.
I have been completing a few of my own UFO’s and have found it strangely satisfying, like you say, it doesn’t really take much to complete it! It just takes a fresh pair of eyes to look at the problem in a new way.
What a lovely post, we could all do with a clapper! lol
Yea, all the hard work (cutting out and starting) is done so not sure why it happened. Us sewers are just too easily distracted and move on too soon! 🙂
Pingback: A quick way to make a thread looper | T H I M B E R L I N A
Pingback: The 2nd Half of MeMadeMay 2017 | T H I M B E R L I N A
Pingback: Refitting My Favourites after My #SlimmingWorldSuccess | T H I M B E R L I N A